
Creating a Bootable USB Drive for Windows 11: A Comprehensive Guide
Related Articles: Creating a Bootable USB Drive for Windows 11: A Comprehensive Guide
Introduction
With enthusiasm, let’s navigate through the intriguing topic related to Creating a Bootable USB Drive for Windows 11: A Comprehensive Guide. Let’s weave interesting information and offer fresh perspectives to the readers.
Table of Content
- 1 Related Articles: Creating a Bootable USB Drive for Windows 11: A Comprehensive Guide
- 2 Introduction
- 3 Creating a Bootable USB Drive for Windows 11: A Comprehensive Guide
- 3.1 Understanding the Process:
- 3.2 Essential Tools and Resources:
- 3.3 Step-by-Step Guide to Creating a Bootable USB Drive:
- 3.4 Troubleshooting Common Issues:
- 3.5 Importance and Benefits of Creating a Bootable USB Drive:
- 3.6 FAQs:
- 3.7 Tips:
- 3.8 Conclusion:
- 4 Closure
Creating a Bootable USB Drive for Windows 11: A Comprehensive Guide
Installing Windows 11 on a new computer, or performing a clean install on an existing one, necessitates a bootable USB drive containing the operating system installation files. This process, known as "writing an ISO to a USB," involves transferring the Windows 11 installation image (ISO file) onto a USB flash drive, transforming it into a bootable media for installation. This guide provides a detailed walkthrough of the process, addressing key considerations and potential challenges.
Understanding the Process:
The process of creating a bootable USB drive for Windows 11 involves the following steps:
- Acquiring the Windows 11 ISO: The first step is to obtain the Windows 11 installation image (ISO file). This can be downloaded from Microsoft’s official website or obtained from a legitimate source.
- Preparing the USB Drive: A USB flash drive with sufficient storage capacity is required. The recommended minimum size is 8 GB, although a larger drive is preferable. The drive needs to be formatted and prepared for the installation process.
- Using a USB Writing Tool: A dedicated software tool is necessary to transfer the ISO file onto the USB drive. Several free and paid tools are available, each with its own user interface and features.
- Verifying the Bootable USB Drive: After the writing process is complete, it is crucial to verify that the USB drive is indeed bootable and ready for installation. This can be done by booting the computer from the USB drive and observing the Windows 11 setup screen.
Essential Tools and Resources:
- Windows 11 ISO File: Download the official Windows 11 ISO file from Microsoft’s website. Ensure you download the correct version (Home or Pro) and architecture (32-bit or 64-bit) for your computer.
- USB Flash Drive: A USB flash drive with at least 8 GB of storage space is required. Choose a drive that is reliable and has a good read/write speed.
-
USB Writing Tool: Several reliable and free tools are available for this purpose, including:
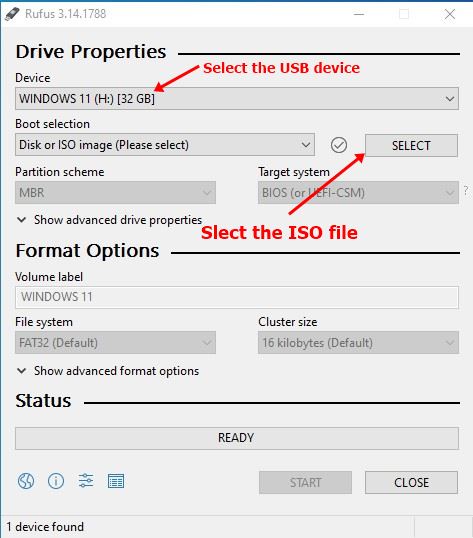
- Rufus: A popular and user-friendly tool known for its simplicity and efficiency.
- BalenaEtcher: A cross-platform tool with a clean interface and support for various operating systems.
- Windows 11 USB/DVD Download Tool: A dedicated tool provided by Microsoft for creating bootable USB drives or DVDs.
Step-by-Step Guide to Creating a Bootable USB Drive:
Step 1: Download the Windows 11 ISO File
- Navigate to the official Microsoft website and locate the Windows 11 download page.
- Select the appropriate version and architecture (Home or Pro, 32-bit or 64-bit) based on your computer’s specifications.
- Choose the desired language and click the "Download" button. The ISO file will begin downloading to your computer.
Step 2: Prepare the USB Flash Drive
- Connect the USB flash drive to your computer.
- Open "File Explorer" and locate the USB drive.
- Right-click on the drive and select "Format."
- In the formatting window, select the "NTFS" file system for Windows 11 compatibility.
- Choose a suitable volume label for the drive (optional).
- Click the "Start" button to format the USB drive.
- Important: Formatting will erase all data on the USB drive. Back up any important files before proceeding.
Step 3: Use a USB Writing Tool
- Download and install a USB writing tool like Rufus, BalenaEtcher, or the Windows 11 USB/DVD Download Tool.
- Launch the chosen tool.
- Select the downloaded Windows 11 ISO file.
- Choose the USB flash drive as the destination.
- Ensure the correct boot settings are selected. For most tools, the default settings are usually sufficient.
- Click the "Start" or "Write" button to begin the writing process.
- The process may take some time depending on the size of the ISO file and the speed of your computer and USB drive.
Step 4: Verify the Bootable USB Drive
- After the writing process is complete, eject the USB drive safely from your computer.
- Restart your computer and enter the BIOS or UEFI settings. This is usually done by pressing a specific key during the boot process (often F2, F10, or Del).
- Navigate to the Boot menu and select the USB drive as the boot priority.
- Save the changes and exit the BIOS/UEFI settings.
- Your computer should now boot from the USB drive. You should see the Windows 11 setup screen.
Troubleshooting Common Issues:
- USB Drive Not Recognized: Ensure the USB drive is properly connected and that the computer recognizes it.
- Writing Process Fails: This could be due to a faulty USB drive, a corrupted ISO file, or a problem with the USB writing tool. Try using a different USB drive, a fresh ISO file, or a different writing tool.
- Computer Cannot Boot from USB: Check the BIOS/UEFI settings to ensure the USB drive is set as the primary boot device.
- Windows 11 Setup Fails: This could be due to incompatible hardware, a corrupted ISO file, or a problem with the USB drive. Try using a different USB drive, a fresh ISO file, or check the minimum system requirements for Windows 11.
Importance and Benefits of Creating a Bootable USB Drive:
- Clean Install: Creating a bootable USB drive allows for a clean installation of Windows 11, removing any existing operating system and its associated files. This can be beneficial for resolving system errors, optimizing performance, or starting fresh.
- Upgrading to Windows 11: If your current computer meets the minimum system requirements, you can use a bootable USB drive to upgrade to Windows 11 from a previous version.
- Troubleshooting and Repair: A bootable USB drive can be used to troubleshoot and repair various system issues, including corrupted files, boot errors, or malware infections.
- Installing Windows 11 on a New Computer: A bootable USB drive is essential for installing Windows 11 on a new computer without a pre-installed operating system.
- Flexibility and Portability: A bootable USB drive provides flexibility and portability, allowing you to install Windows 11 on multiple computers without needing to download the ISO file repeatedly.
FAQs:
Q: Can I use a DVD instead of a USB drive?
A: While creating a bootable DVD is possible, USB drives are generally preferred due to their faster read/write speeds and portability.
Q: What if my computer doesn’t have a USB port?
A: If your computer lacks a USB port, you may need to use an external USB adapter or consider using a bootable DVD instead.
Q: Can I use a different USB writing tool?
A: Yes, there are numerous free and paid USB writing tools available. The chosen tool should be compatible with the Windows 11 ISO file and your computer’s operating system.
Q: What if the writing process fails?
A: If the writing process fails, try using a different USB drive, a fresh ISO file, or a different USB writing tool. Ensure the USB drive is properly formatted and connected to the computer.
Q: What should I do if my computer cannot boot from the USB drive?
A: Check the BIOS/UEFI settings to ensure the USB drive is set as the primary boot device. You may need to adjust the boot order in the BIOS/UEFI menu.
Q: What if the Windows 11 setup fails?
A: If the Windows 11 setup fails, try using a different USB drive, a fresh ISO file, or check the minimum system requirements for Windows 11. Ensure that your hardware is compatible with Windows 11.
Tips:
- Use a Reliable USB Drive: Choose a reputable brand and a USB drive with a good read/write speed for optimal performance.
- Download the ISO from a Legitimate Source: Always download the Windows 11 ISO file from Microsoft’s official website or a trusted source to ensure its authenticity and safety.
- Back Up Important Data: Before formatting the USB drive, back up any important files stored on it.
- Verify the Bootable USB Drive: After the writing process is complete, verify that the USB drive is indeed bootable by attempting to boot from it.
- Check the BIOS/UEFI Settings: Ensure that the USB drive is set as the primary boot device in the BIOS/UEFI settings.
- Read the Documentation: Refer to the documentation of the USB writing tool for specific instructions and troubleshooting tips.
Conclusion:
Creating a bootable USB drive for Windows 11 is a straightforward process that allows for clean installations, upgrades, troubleshooting, and installations on new computers. By following the steps outlined in this guide, you can easily create a bootable USB drive and install Windows 11 on your computer. Remember to use reliable tools, download the ISO file from a legitimate source, and back up your data before proceeding. With careful planning and execution, the process should be seamless and successful.

![How to Make Windows 11 Bootable USB Drive [Step-by-Step Guide] - MiniTool Partition Wizard](https://www.partitionwizard.com/images/uploads/2021/07/windows-11-bootable-usb-drive-thumbnail.jpg)

Closure
Thus, we hope this article has provided valuable insights into Creating a Bootable USB Drive for Windows 11: A Comprehensive Guide. We appreciate your attention to our article. See you in our next article!