
The Enigma of the Truncated Display: Understanding and Resolving Screen Clipping Issues in Windows
Related Articles: The Enigma of the Truncated Display: Understanding and Resolving Screen Clipping Issues in Windows
Introduction
With enthusiasm, let’s navigate through the intriguing topic related to The Enigma of the Truncated Display: Understanding and Resolving Screen Clipping Issues in Windows. Let’s weave interesting information and offer fresh perspectives to the readers.
Table of Content
The Enigma of the Truncated Display: Understanding and Resolving Screen Clipping Issues in Windows

The seamless flow of digital information is often disrupted by unexpected visual anomalies, one of the most frustrating being the phenomenon of screen clipping. This occurs when a portion of the screen’s content, typically the top, is inexplicably cut off, leaving users with a frustratingly incomplete view. This article aims to demystify the reasons behind this issue, explore potential solutions, and provide a comprehensive understanding of the factors that contribute to this visual impairment.
The Root Causes of Screen Clipping:
Screen clipping is not a singular issue but rather a symptom of various underlying problems. Identifying the root cause is crucial for finding the appropriate solution. Here are some of the most common culprits:
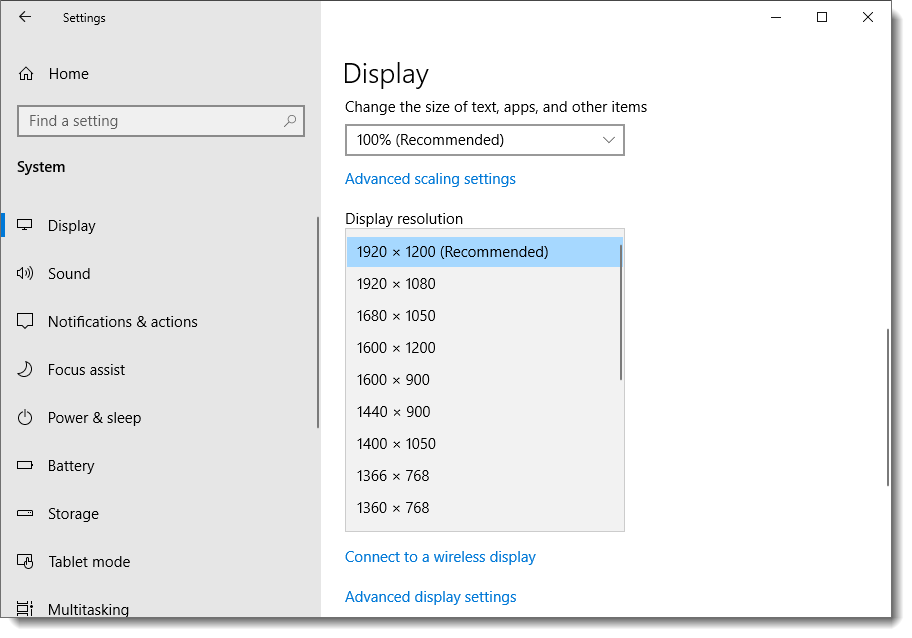
1. Incorrect Display Resolution:
A mismatch between the display’s native resolution and the resolution set in Windows can lead to screen clipping. The display’s native resolution is its optimal setting, providing the sharpest and clearest image. When Windows is set to a lower resolution, the content may be scaled down, resulting in the top portion being cropped.
2. Faulty Display Drivers:
Outdated, corrupted, or incompatible display drivers can cause a range of issues, including screen clipping. These drivers act as intermediaries between the operating system and the graphics card, and any malfunction can disrupt the proper functioning of the display.
3. Overlapping Windows:
While seemingly obvious, a hidden window or application might be positioned over the top of the screen, effectively obscuring the content. This can occur due to accidental window placement or a program that runs minimized in the system tray.
4. Software Conflicts:
Certain software applications, especially those with custom interface elements, can interfere with the display settings and cause screen clipping. This is often a result of incompatibility issues or bugs within the software.
5. Physical Display Malfunctions:
In rare cases, the issue might stem from a physical problem with the display itself. This could involve a damaged display panel, a malfunctioning backlight, or a faulty connection between the display and the computer.
6. Scaling Issues:
Windows’ scaling feature, designed to adjust the display size for different screen resolutions, can sometimes cause unintended consequences. When scaling is incorrectly configured, it can lead to screen clipping, especially on high-resolution displays.
7. System Resource Limitations:
Insufficient system resources, such as insufficient RAM or CPU power, can strain the system and lead to various display anomalies, including screen clipping. This is particularly common when running demanding applications or multiple programs simultaneously.
Diagnosis and Troubleshooting:
Addressing screen clipping requires a systematic approach. Begin by analyzing the symptoms and narrowing down the potential causes. Here’s a step-by-step guide:
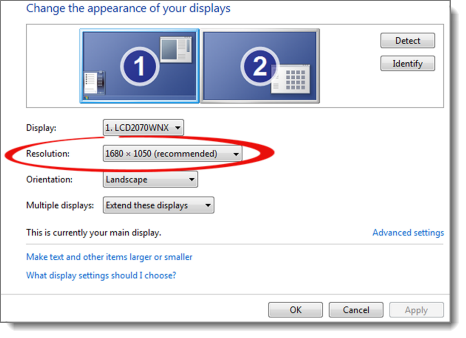
1. Check Display Resolution:
- Right-click on the desktop and select "Display settings."
- In the "Display" settings, locate the "Resolution" section and ensure that the selected resolution matches the native resolution of your display.
- If the selected resolution is lower, try increasing it to the native resolution.
2. Update Display Drivers:
- Go to the "Device Manager" by searching for it in the Windows search bar.
- Expand the "Display adapters" section and locate your graphics card.
- Right-click on the graphics card and select "Update driver."
- Choose "Search automatically for updated driver software" and follow the on-screen instructions.
3. Check for Overlapping Windows:
- Review the taskbar and system tray for any minimized or hidden windows that might be covering the top of the screen.
- If you find any, close or move them to reveal the obscured content.
4. Identify and Troubleshoot Software Conflicts:
- Identify any recently installed software that might be causing the issue.
- Temporarily disable or uninstall the suspected software to see if the problem resolves.
- If the problem is resolved, consider updating or reinstalling the software or contacting the developer for support.
5. Examine Physical Display for Malfunctions:
- Inspect the display for any visible damage, loose connections, or flickering.
- Try connecting the display to a different computer or using a different cable to rule out hardware issues.
6. Adjust Scaling Settings:
- In the "Display settings," locate the "Scale and layout" section.
- Ensure that the scaling level is set appropriately for your display resolution.
- Experiment with different scaling levels to find the optimal setting.
7. Optimize System Resources:
- Close unnecessary programs and applications to reduce system load.
- Consider increasing the amount of RAM or upgrading the CPU if your system is consistently running low on resources.
Frequently Asked Questions (FAQs):
Q: Why does my screen cut off at the top when I change the resolution?
A: Changing the resolution to a value lower than the display’s native resolution can cause the content to be scaled down, leading to the top portion being cut off.
Q: My screen is cutting off the top, but I can see the taskbar. What could be the issue?
A: This could indicate a software conflict or an overlapping window that is obscuring the top portion of the screen, but leaving the taskbar visible.
Q: What should I do if my display driver update doesn’t solve the screen clipping problem?
A: If updating the driver doesn’t resolve the issue, consider rolling back to the previous driver version or contacting the graphics card manufacturer for support.
Q: Can screen clipping be caused by a virus or malware?
A: While unlikely, it is possible for malware to interfere with display settings and cause screen clipping. Run a comprehensive malware scan to rule out this possibility.
Tips for Preventing Screen Clipping:
- Use the display’s native resolution whenever possible.
- Keep your display drivers up to date.
- Avoid installing unnecessary software that could conflict with display settings.
- Regularly clean and inspect your display for any physical damage or loose connections.
- Monitor system resource usage and close unnecessary programs to avoid overloading the system.
Conclusion:
Screen clipping, while a frustrating experience, is often a solvable problem. By understanding the underlying causes and following a systematic troubleshooting approach, users can effectively diagnose and resolve this issue, restoring their digital world to its intended visual integrity. Remember, patience and a methodical approach are key to uncovering the root cause and achieving a seamless viewing experience.


Closure
Thus, we hope this article has provided valuable insights into The Enigma of the Truncated Display: Understanding and Resolving Screen Clipping Issues in Windows. We thank you for taking the time to read this article. See you in our next article!